How to Migrate Your Website Without Downtime: A JumboNIC Guide
Migrating a website can seem daunting — especially when your business relies on it for sales, leads, or customer engagement. One of the biggest fears during migration is downtime, which can cost revenue, harm SEO, and frustrate users.
At JumboNIC, we specialize in seamless website migrations that prioritize speed, security, and uninterrupted access. In this guide, we’ll walk you through the steps to migrate your website without downtime and ensure a smooth transition.
🖥️ Why Downtime Happens During Website Migration
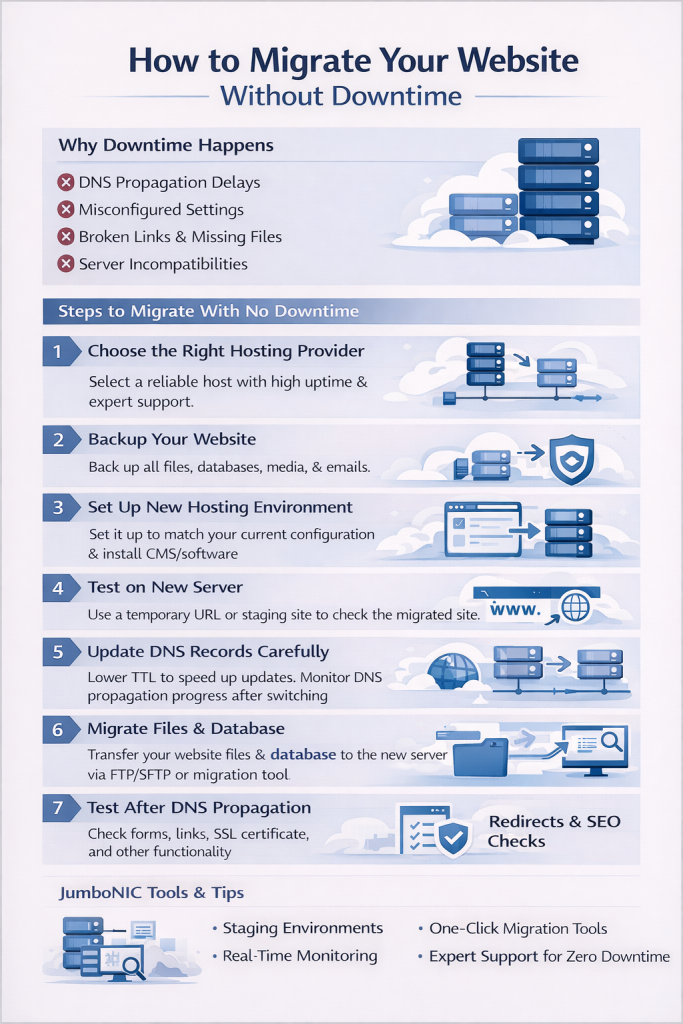
Downtime typically occurs when your website is unavailable to visitors because DNS changes, server transfers, or database updates haven’t fully propagated. Common causes include:
Propagation delays after updating DNS records
Misconfigured hosting settings or SSL certificates
Broken links or missing files after migration
Server incompatibilities or resource limitations
Even short periods of downtime can impact user experience, search rankings, and revenue. That’s why careful planning is essential.
⚡ Step 1: Choose the Right Hosting Provider
Selecting a reliable hosting provider is the first step in minimizing downtime. Look for:
High uptime guarantees (99.9% or higher)
Optimized server configurations for your CMS
Expert support to assist with migration
JumboNIC Advantage: JumboNIC offers managed hosting with 24/7 support, making migrations smooth and ensuring your website remains online throughout the process.
⚡ Step 2: Backup Your Website
Before making any changes, create a full backup of your website, including:
Website files
Databases
Media libraries
Email accounts (if hosted on the same server)
JumboNIC Tip: Use AutoBackup Vault to automatically save encrypted, versioned copies of your website — ensuring you can restore it instantly if needed.
⚡ Step 3: Set Up Your New Hosting Environment
Prepare your new hosting account to match your current website’s configuration:
Install the same CMS version (e.g., WordPress)
Set up databases and user permissions
Configure PHP versions, SSL certificates, and caching
JumboNIC Insight: JumboNIC provides pre-configured hosting environments optimized for WordPress, Joomla, and other popular CMS platforms to reduce setup errors.
⚡ Step 4: Test Your Website on the New Server
Before switching your domain, test the website on the new server using a temporary URL or staging environment. Check for:
Broken links or missing media
Plugin or theme compatibility
Form submissions and payment gateways
JumboNIC Staging Feature: JumboNIC offers staging sites that allow you to test migrations without affecting your live website.
⚡ Step 5: Update DNS Records Carefully
DNS changes tell the internet where your website is hosted. To avoid downtime:
Lower your current DNS TTL (Time to Live) a few hours or days before migration.
Update the A record to point to your new server IP.
Monitor propagation using tools like WhatsMyDNS.
Tip: Keep your old server active for at least 48–72 hours to handle any traffic during propagation.
⚡ Step 6: Migrate Your Website Files and Database
Use FTP/SFTP or JumboNIC’s migration tool to transfer files.
Export your database from the old server and import it to the new server.
Update configuration files (e.g.,
wp - config.phpfor WordPress) to point to the new database.
💡 Pro Tip: JumboNIC’s One-Click Migration Tool automates these steps, reducing errors and minimizing downtime risk.
⚡ Step 7: Test Live Website After DNS Propagation
Once DNS changes have fully propagated:
Test your website functionality (forms, payments, logins)
Check for broken links or missing media
Verify SSL certificates and HTTPS status
JumboNIC Monitoring: Use real-time monitoring dashboards to ensure your website is fully operational and performing optimally after migration.
⚡ Step 8: Implement Redirects and SEO Checks
To preserve SEO rankings:
Set up 301 redirects for any changed URLs
Verify sitemap and robots.txt files
Submit updated URLs to Google Search Console
JumboNIC Insight: Our managed hosting plans include SEO-friendly tools to ensure migrations do not negatively impact search engine visibility.
🧠 JumboNIC’s Expert Tip for Zero Downtime
The key to a successful migration is planning, testing, and using reliable tools. JumboNIC offers:
Automated backup and restore systems
Staging environments for testing
Real-time monitoring during and after migration
Expert support to resolve issues instantly
With these features, businesses can migrate their website without a single minute of downtime.
🌟 Final Thoughts
Migrating your website doesn’t have to be stressful. With careful preparation, thorough testing, and a trusted hosting partner like JumboNIC, you can ensure a smooth transition that keeps your website fast, secure, and always online.
🚀 Migrate Your Website Stress-Free with JumboNIC
Avoid downtime and technical headaches. JumboNIC provides managed migration, expert support, and optimized hosting to keep your website running perfectly throughout the process.
Visit www.jumbonic.com to learn more about zero-downtime website migration services and start your seamless transition today.